Dear reader, as of early 2020, the Tezos platform is becoming mature enough that functional and resilient applications can be built with it. Cryptonomic has been building tools for Tezos since late 2017 with the intention of creating a seamless end to end experience for Tezos developers. In this handbook, we provide a variety of resources, tutorials and overviews that will help any blockchain developer get up and running quickly with the Tezos platform.
The quickest way to become productive is to first read the Cryptonomic Stack section followed by the twenty minute tour tutorial. More detailed information about the tools mentioned can be found in the Documentation section. Support is available through Matrix / Riot and email.
This handbook is a living document so it will keep evolving as we add new content, enhance our tools and add new capabilities. Of course, we are also highly receptive to user feedback so expect us to add more content in response to user requests. Speaking of, if you have any ideas for content we should add here, do not hesitate to open a GitHub issue.
The Cryptonomic stack consists of several tools which are build to work seamlessly together. Odds are if you start working with any one of the tools, the rest will be easy for you to adopt.
The stack is great for fetching and viewing blockchain data, deploying and managing smart contracts, building wallets and visualizations and various kinds of developer tooling.
The stack isn't great yet for building user-facing dApps as battle-tested equivalents for MetaMask and other browser plugins are still under development. As we get closer to release for these tools, we will update the documentation here. Maybe you can be the one to build your own tools to make it easy to build Tezos dApps. :)
Setting up a development environment for blockchains is notoriously hard. It can be quite arduous and time-consuming to stand up blockchain and indexer nodes. Worry not, we do the hard work so you can focus purely on your work. Nautilus Cloud provides hosted Tezos and Conseil nodes so you can use them and get started right away. Once your application is ready for production, you can decide how decentralized you want to be and either continue using Nautilus Cloud or stand up your own nodes.
If you are an Ethereum developer, you can simply think of Nautilus Cloud as an equivalent of Infura, except instead of simply offering you blockchain nodes, Nautilus Cloud also offers indexers and others services to make your dApp more powerful and your life much easier.
Pulling data out of blockchains can also be notoriously difficult. Many developers choose to pull data out of their blockchain nodes and store it in a database for easy querying. This is call indexing. Conseil serves as an indexer for the Tezos blockchain. Not only does it provide blockchain data using REST but it also provides metadata to help developers identify and pull the data they need. Nautilus Cloud provides access to Conseil nodes for the major Tezos networks. See the Tutorials section for guides on querying data with Conseil. Conseil is written in the functional style using the Scala programming language.
Notable third-party development libraries which integrate with Conseil include ConseilPy (Python) and TezosKit (Swift) and TezosJ (Android).
Most front end developers these days like to work with Node libraries. ConseilJS is an NPM library written in TypeScript that allows developers to read from and write to the Tezos blockchain. A variety of applications can be built using ConseilJS. At Cryptonomic, we have used it to build Galleon, Arronax and Mininax, among other projects. ConseilJS is also available as a standalone JavaScript file.
For Ethereum developers, ConseilJS is a rough analogue of web3.js but supports a greater class of functionalities, including key management, hardware wallet connectivity and blockchain data queries.
Galleon is a wallet for the Tezos platform. It works equally well with real tez from mainnet and play tez from the major testnet faucets. Developers will find Galleon useful for deploying and invoking smart contracts without writing front end code. This is especially useful if you are simply trying to prototype smart contract code using a tool like SmartPy.
Block explorers can be fairly limiting if you are not a regular wallet users. Blockchain developers need to run rich queries to check on their application's behavior, debug issues and get analytics information about app usage. This is why we created Arronax (using Conseil as its data provider). Arronax will allow you to run queries and generate reports tailored to your specific needs. It will help you find your top users, find your biggest transactions and most popular smart contract entry points. Go ahead and give Arronax a spin right now!
Sometimes you just want to keep things simple and use a good old block explorer. We built Mininax as a retro mininax explorer serving as an entrypoint into Arronax as a fun summer project using ReasonML. Now it's evolving into a full-fledged explorer in its own right. Soon, there will be features which will make viewing and investigating smart contracts much more intuitive.
In this tutorial, we are going to get a quick taste of the Cryptonomic stack by deploying and examining a simple Tezos smart contract.
If you are not at least mildly familiar with the Cryptonomic stack, it might be worthwhile reading our overview.
We need to get access to the blockchain and its data by visiting Nautilus Cloud and logging in with our GitHub account. Once you are logged in you should see something like this:
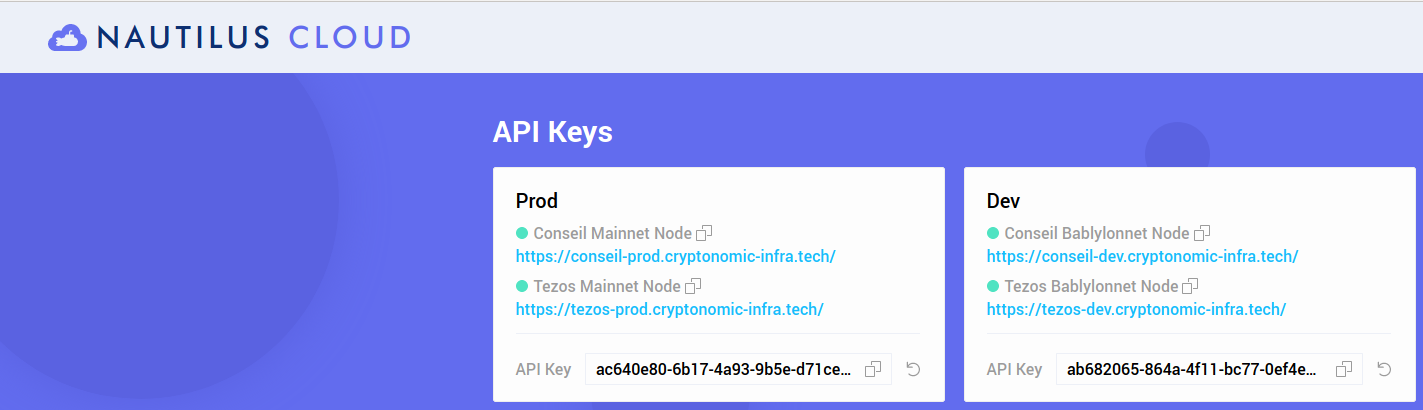
Nautilus Cloud offers two environments, 'prod' which runs against the Tezos mainnet and 'dev' which runs against a testnet. For each environment, we get the URL to use to access Conseil and Tezos nodes along with the API keys we need to use. In this tutorial, we will be working with a testnet so let's note the URLs and the Conseil API key (in this case 'ab682065-864a-4f11-bc77-0ef4e9493fa1').
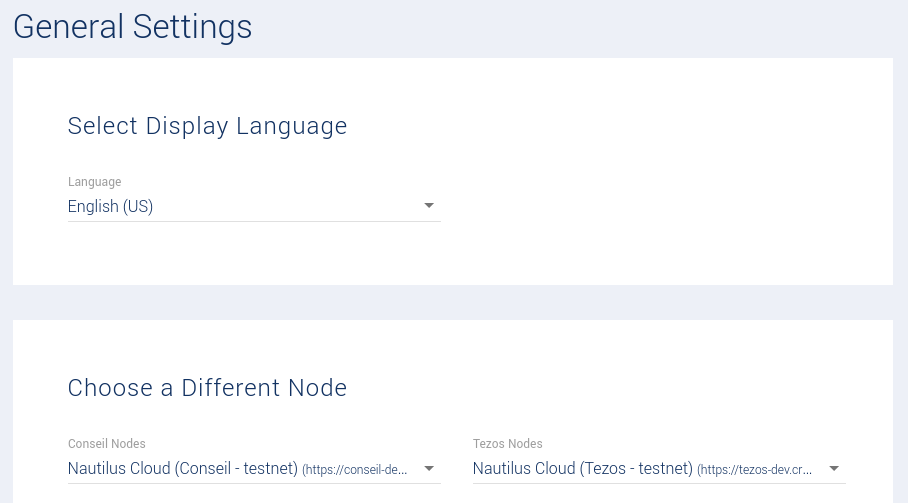
Now we need to get some testnet funds with which we can originate a contract and play with it. Let's download the Galleon wallet and install it on our system. Once the wallet is up, we'll need to click on 'Settings' on the top right and make the wallet point to the testnet by changing the settings for both the Tezos and Conseil nodes:
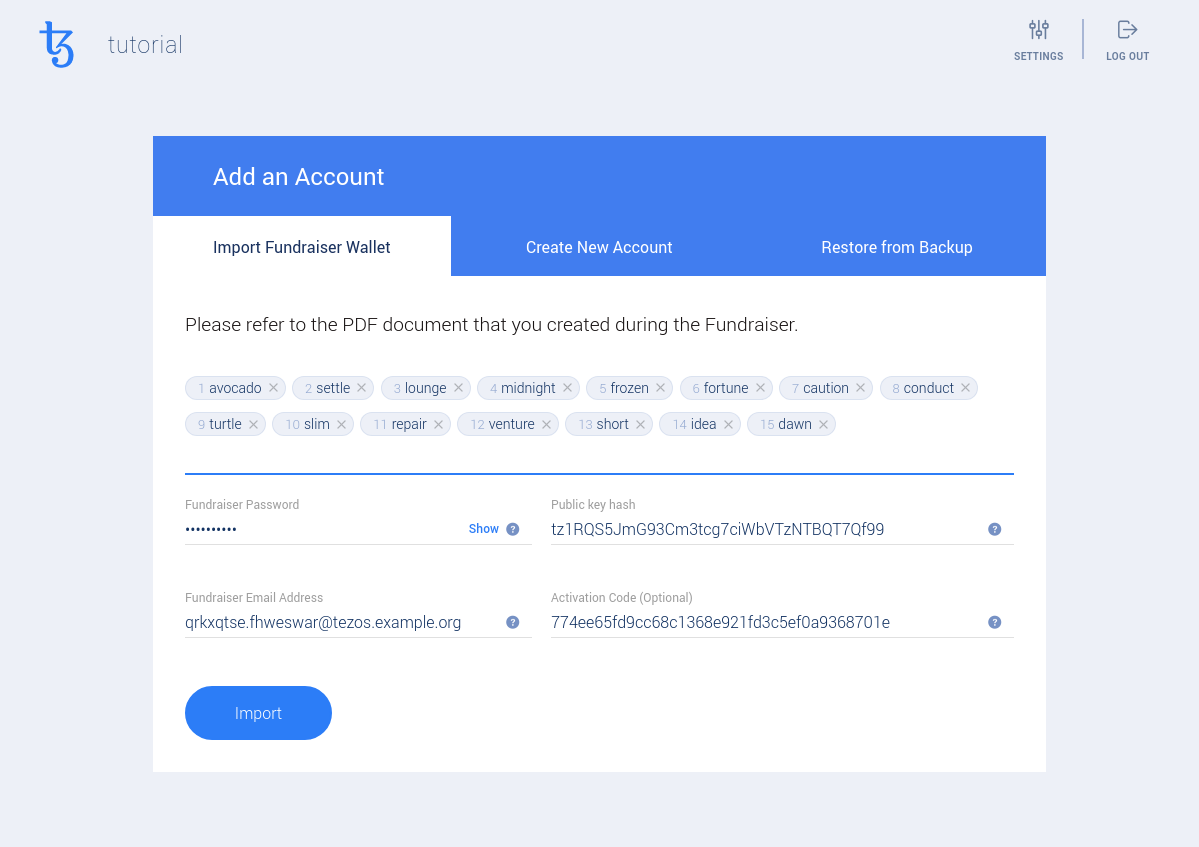
Let's click on "Back to Wallet" and then "Create new Wallet" to get a new wallet going. Pick a file location and provide a strong password as requested. On the next screen, we'll use the "Import Fundraiser Wallet" option to import a free faucet account with tez for us to play with. Visit the Tezos Faucet and download a JSON document. The document should look something like this:
        {
            "mnemonic": [
                "avocado",
                "settle",
                "lounge",
                "midnight",
                "frozen",
                "fortune",
                "caution",
                "conduct",
                "turtle",
                "slim",
                "repair",
                "venture",
                "short",
                "idea",
                "dawn"
            ],
            "secret": "774ee65fd9cc68c1368e921fd3c5ef0a9368701e",
            "amount": "17214214921",
            "pkh": "tz1RQS5JmG93Cm3tcg7ciWbVTzNTBQT7Qf99",
            "password": "cmaWby2yF6",
            "email": "[email protected]"
            }
Transfer the contents of the JSON document into the Galleon import screen so it looks something like this:
After you hit the Import button and wait for a couple of minutes, you should see your account address and non-zero tez balance:
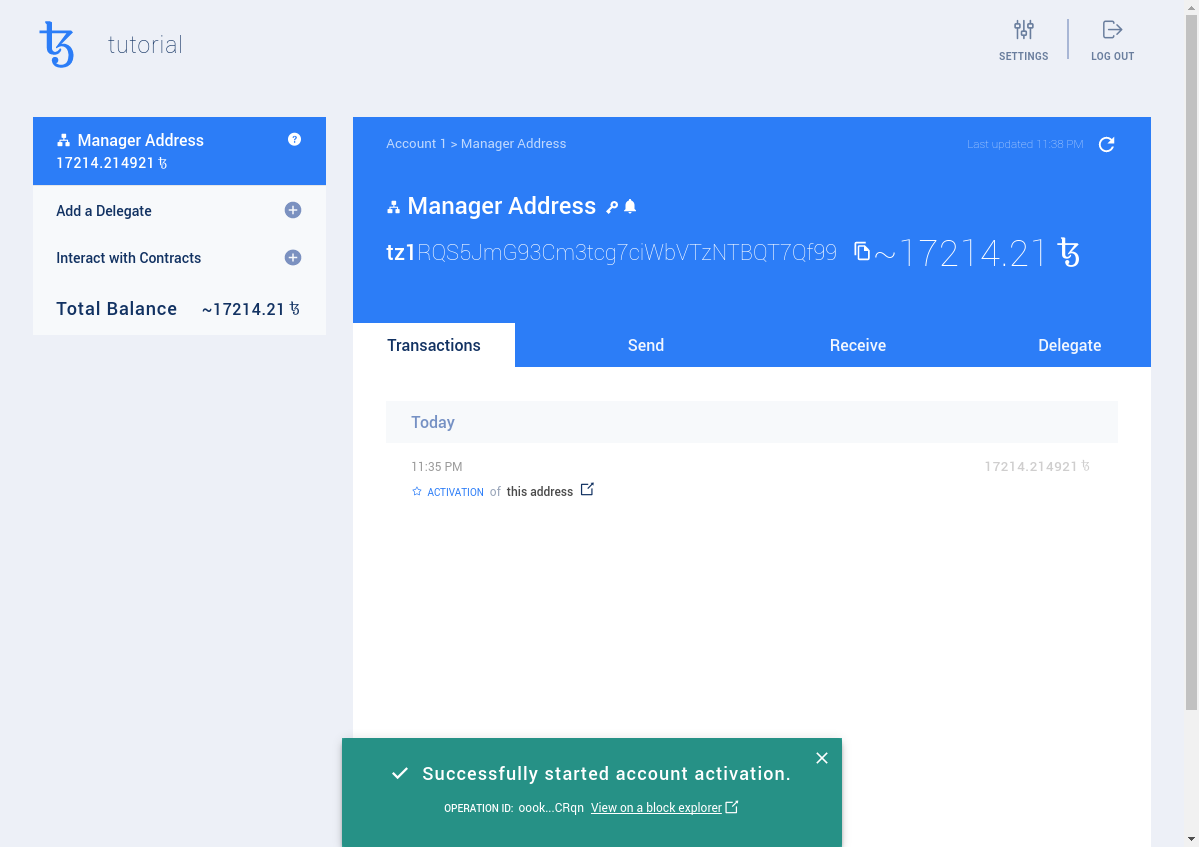
Not bad! We have 17,214 tez to play with!
Now we'll write a very simple Tezos smart contract in SmartPy using the online SmartPy IDE. Here is the code we are going to use:
        import smartpy as sp

        class MyContract(sp.Contract):
            # Sets stored string at initialization.
            def __init__(self, param1):
                self.init(contents = param1)

            # Updates stored string when called.
            @sp.entry_point
            def update(self, params):
                self.data.contents = params

        # Test
        @sp.add_test(name = "TheTest")
        def test():
            # We define a test scenario, together with some outputs and checks
            scenario = sp.test_scenario()

            # We first define a contract and add it to the scenario
            c1 = MyContract("Hello")
            scenario += c1

            # And call some of its entry points
            scenario += c1.update("Goodbye")

            # Finally, we check its final storage
            scenario.verify(c1.data.contents == "Goodbye")
This contract simply stores a string. It's given an initial value during origination and it has a function which allows that value to be updated. In the test above, the contract is initialized with "Hello" and is later updated to "World". Very simple! Paste this code into the SmartPy editor and hit the green play button. You should see something like this:
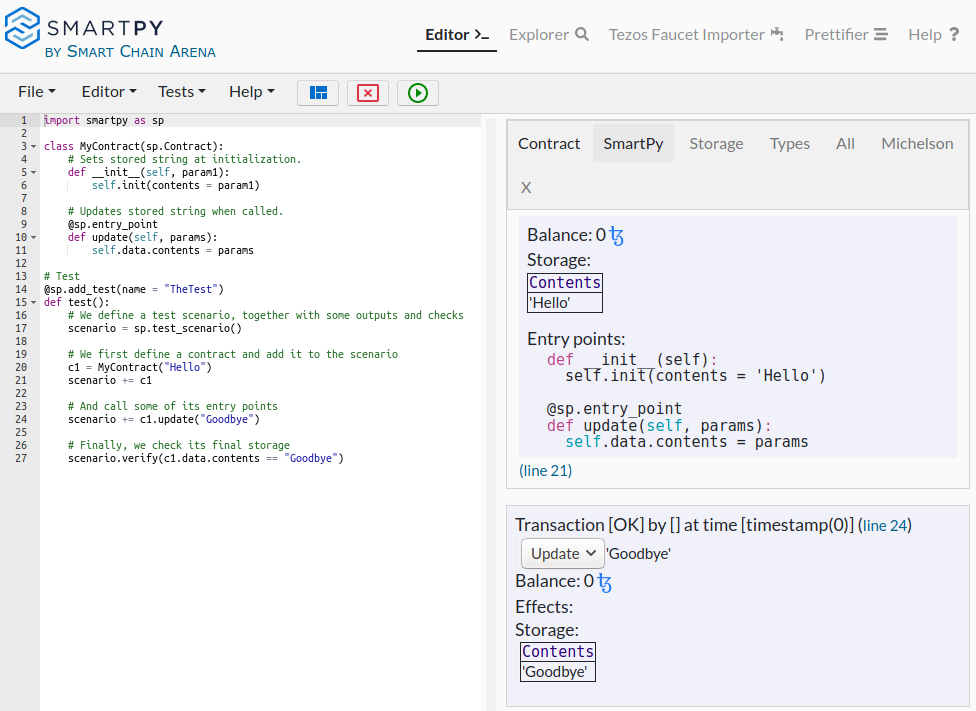
The SmartPy editor is a great tool for prototyping Tezos smart contracts. Not only is SmartPy an intuitive Python-like language but the editor allows us to write unit tests to validate our functionality. On the right side, we can see the initial state of the contract as well as the effect of each test. Neat! Feel free to play around with SmartPy later to get a sense of the language and all the functionality of the editor.
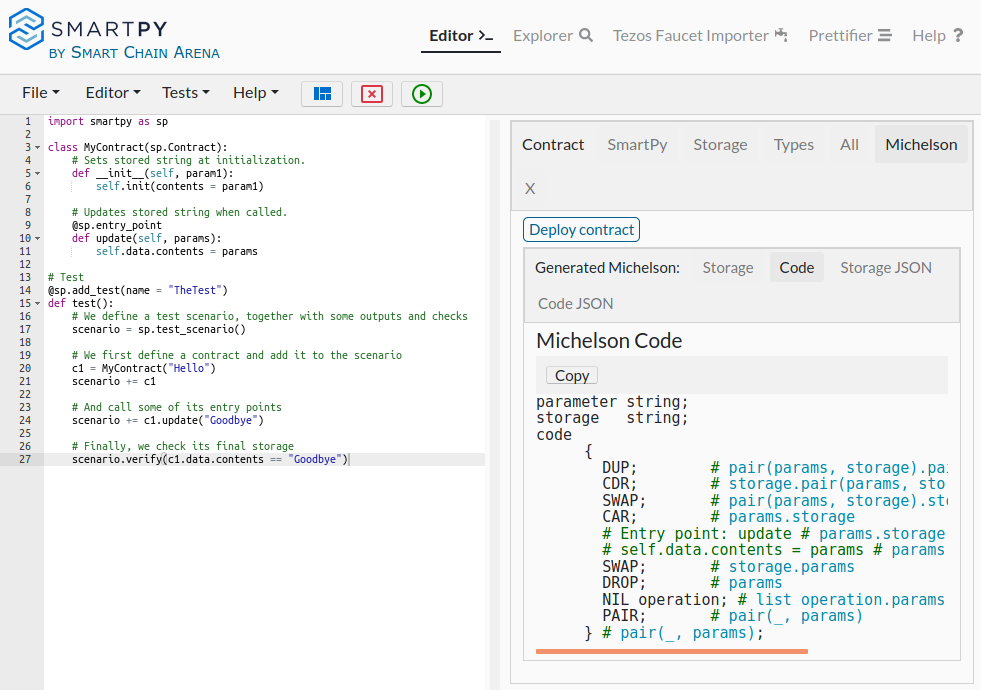
Of course, Michelson is the official language of Tezos smart contracts and our code so far is in SmartPy. Click on the Michelson tab in the editor and then 'Code' to get the Michelson code corresponding to the SmartPy code we just wrote:
Now we will use Galleon to deploy this contract and, later, call it once. In Galleon, click on "Interact with Contracts" and then "Deploy a New Contract". Change the format to "Michelson", paste in the code from above, set the initial storage to "Hello", pick a high fee and set the gas and storage limits as shown and deploy the contract:
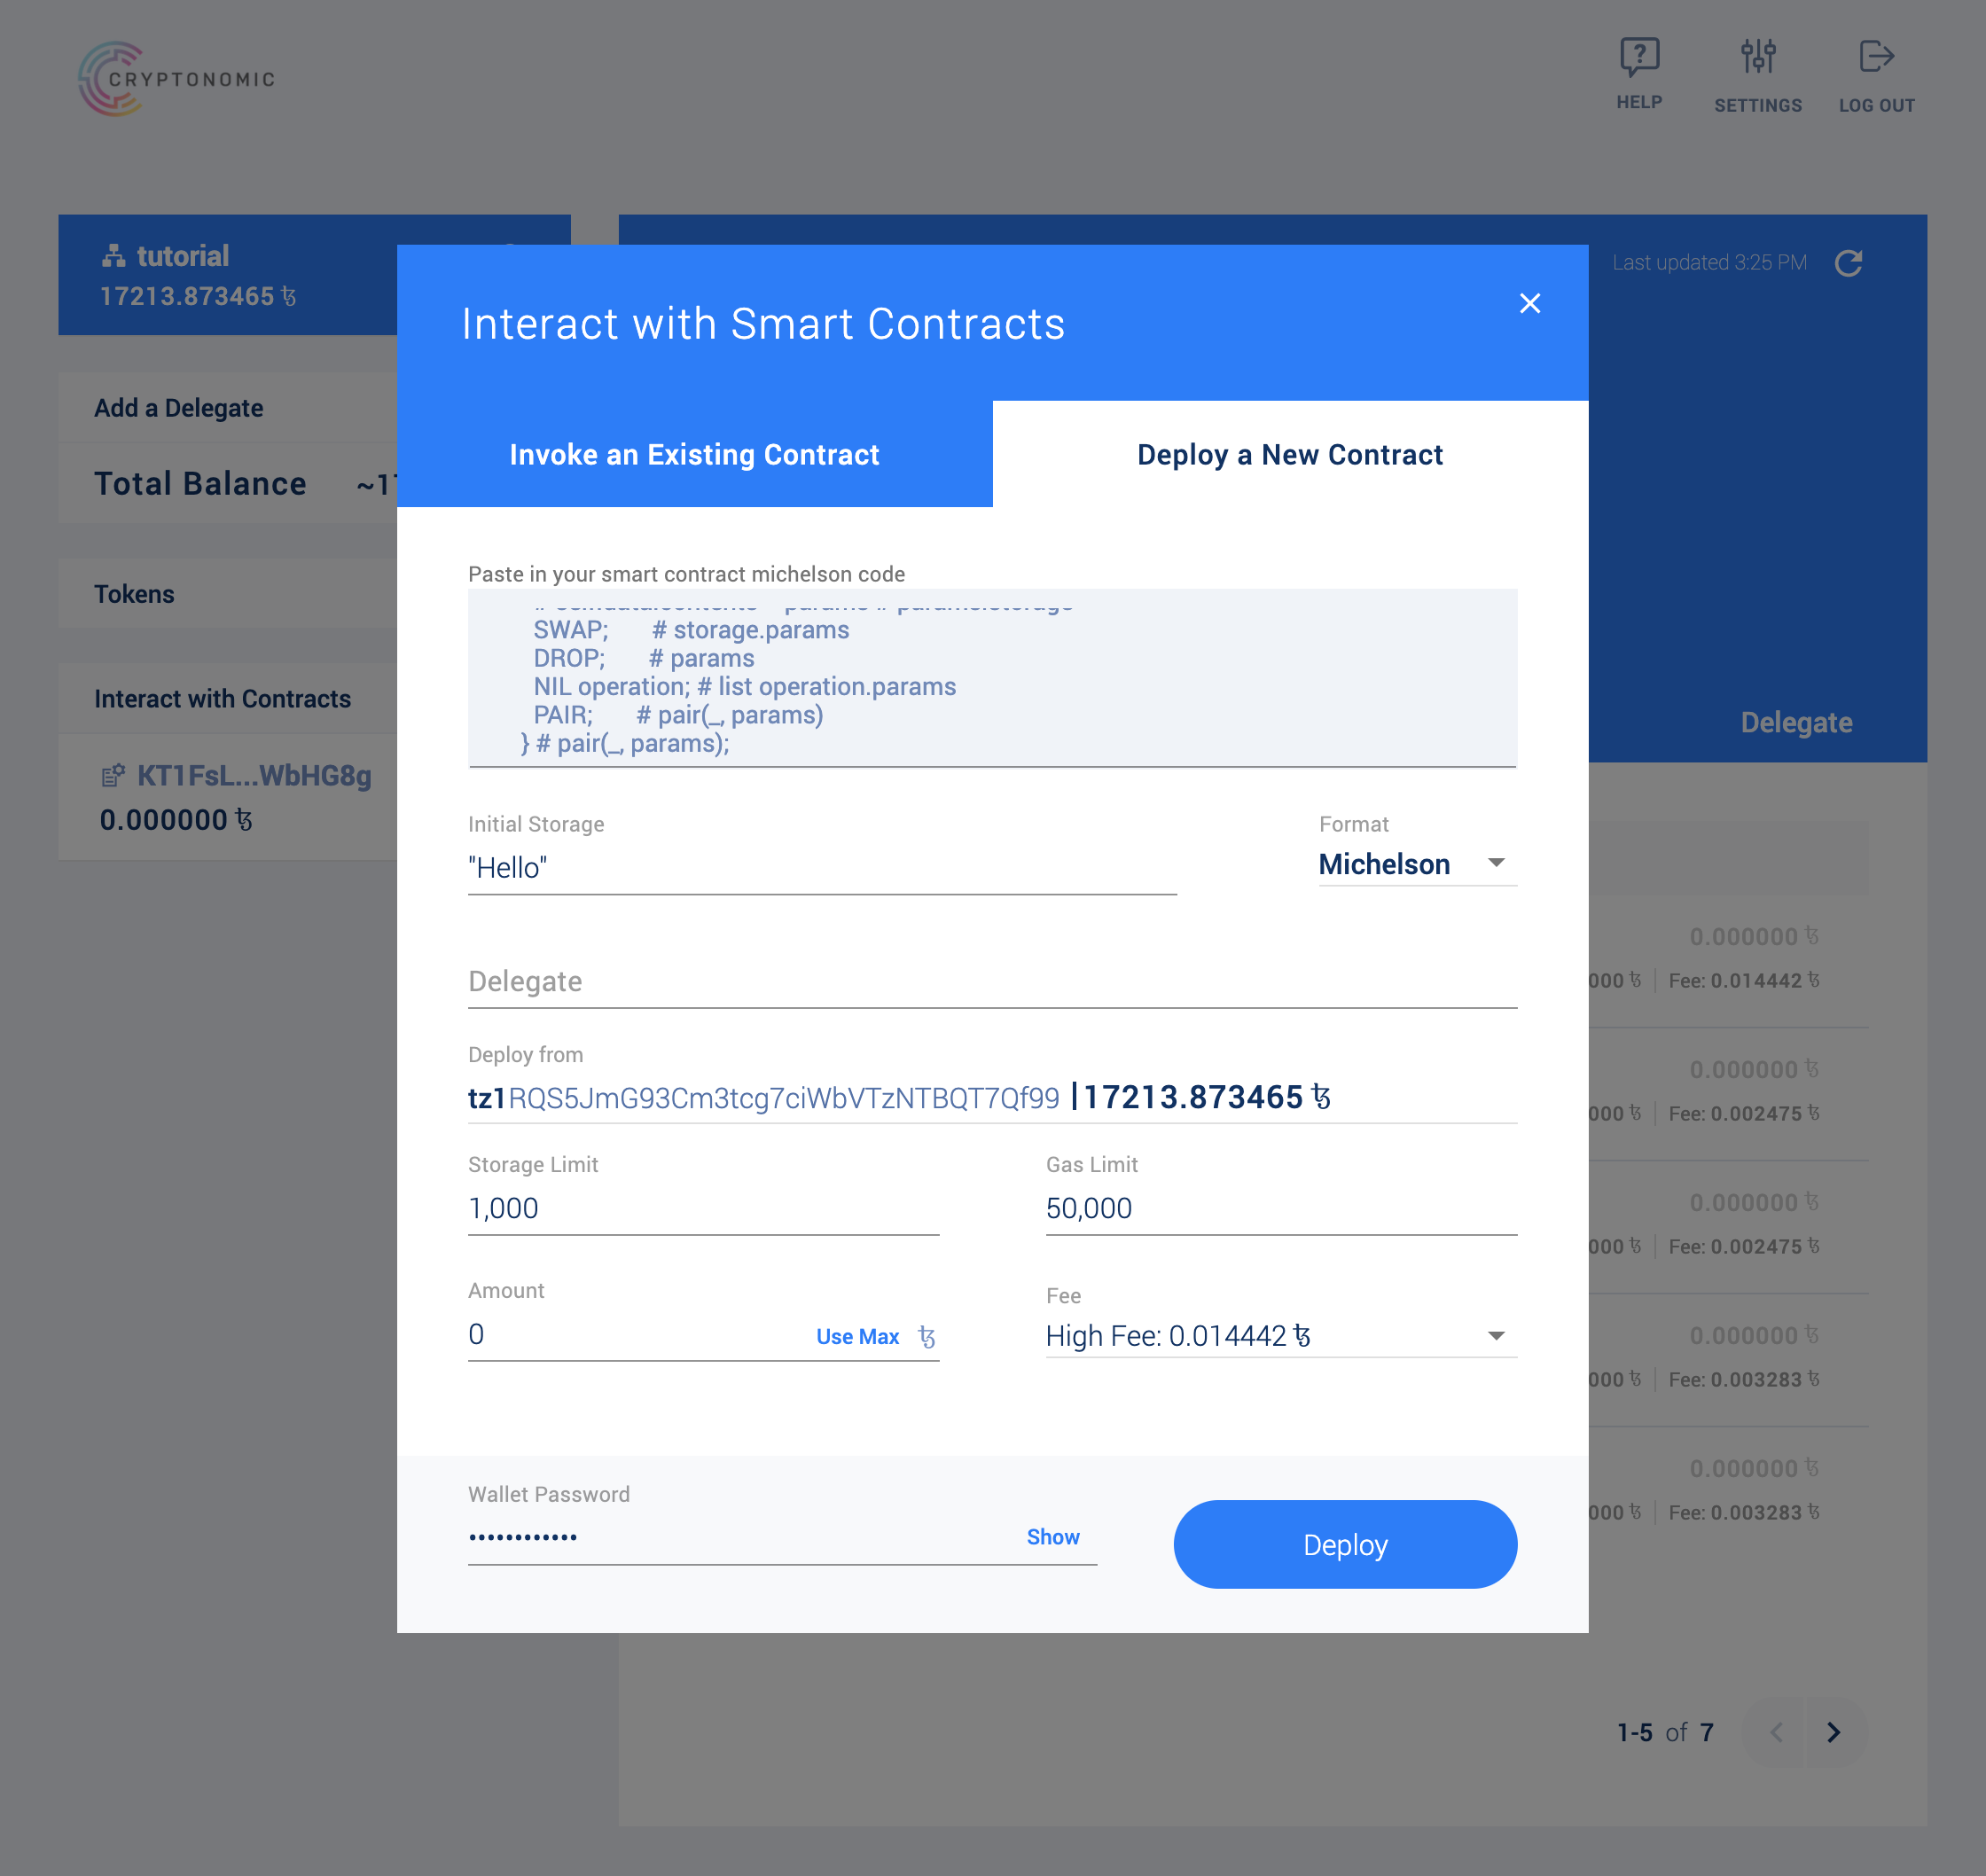
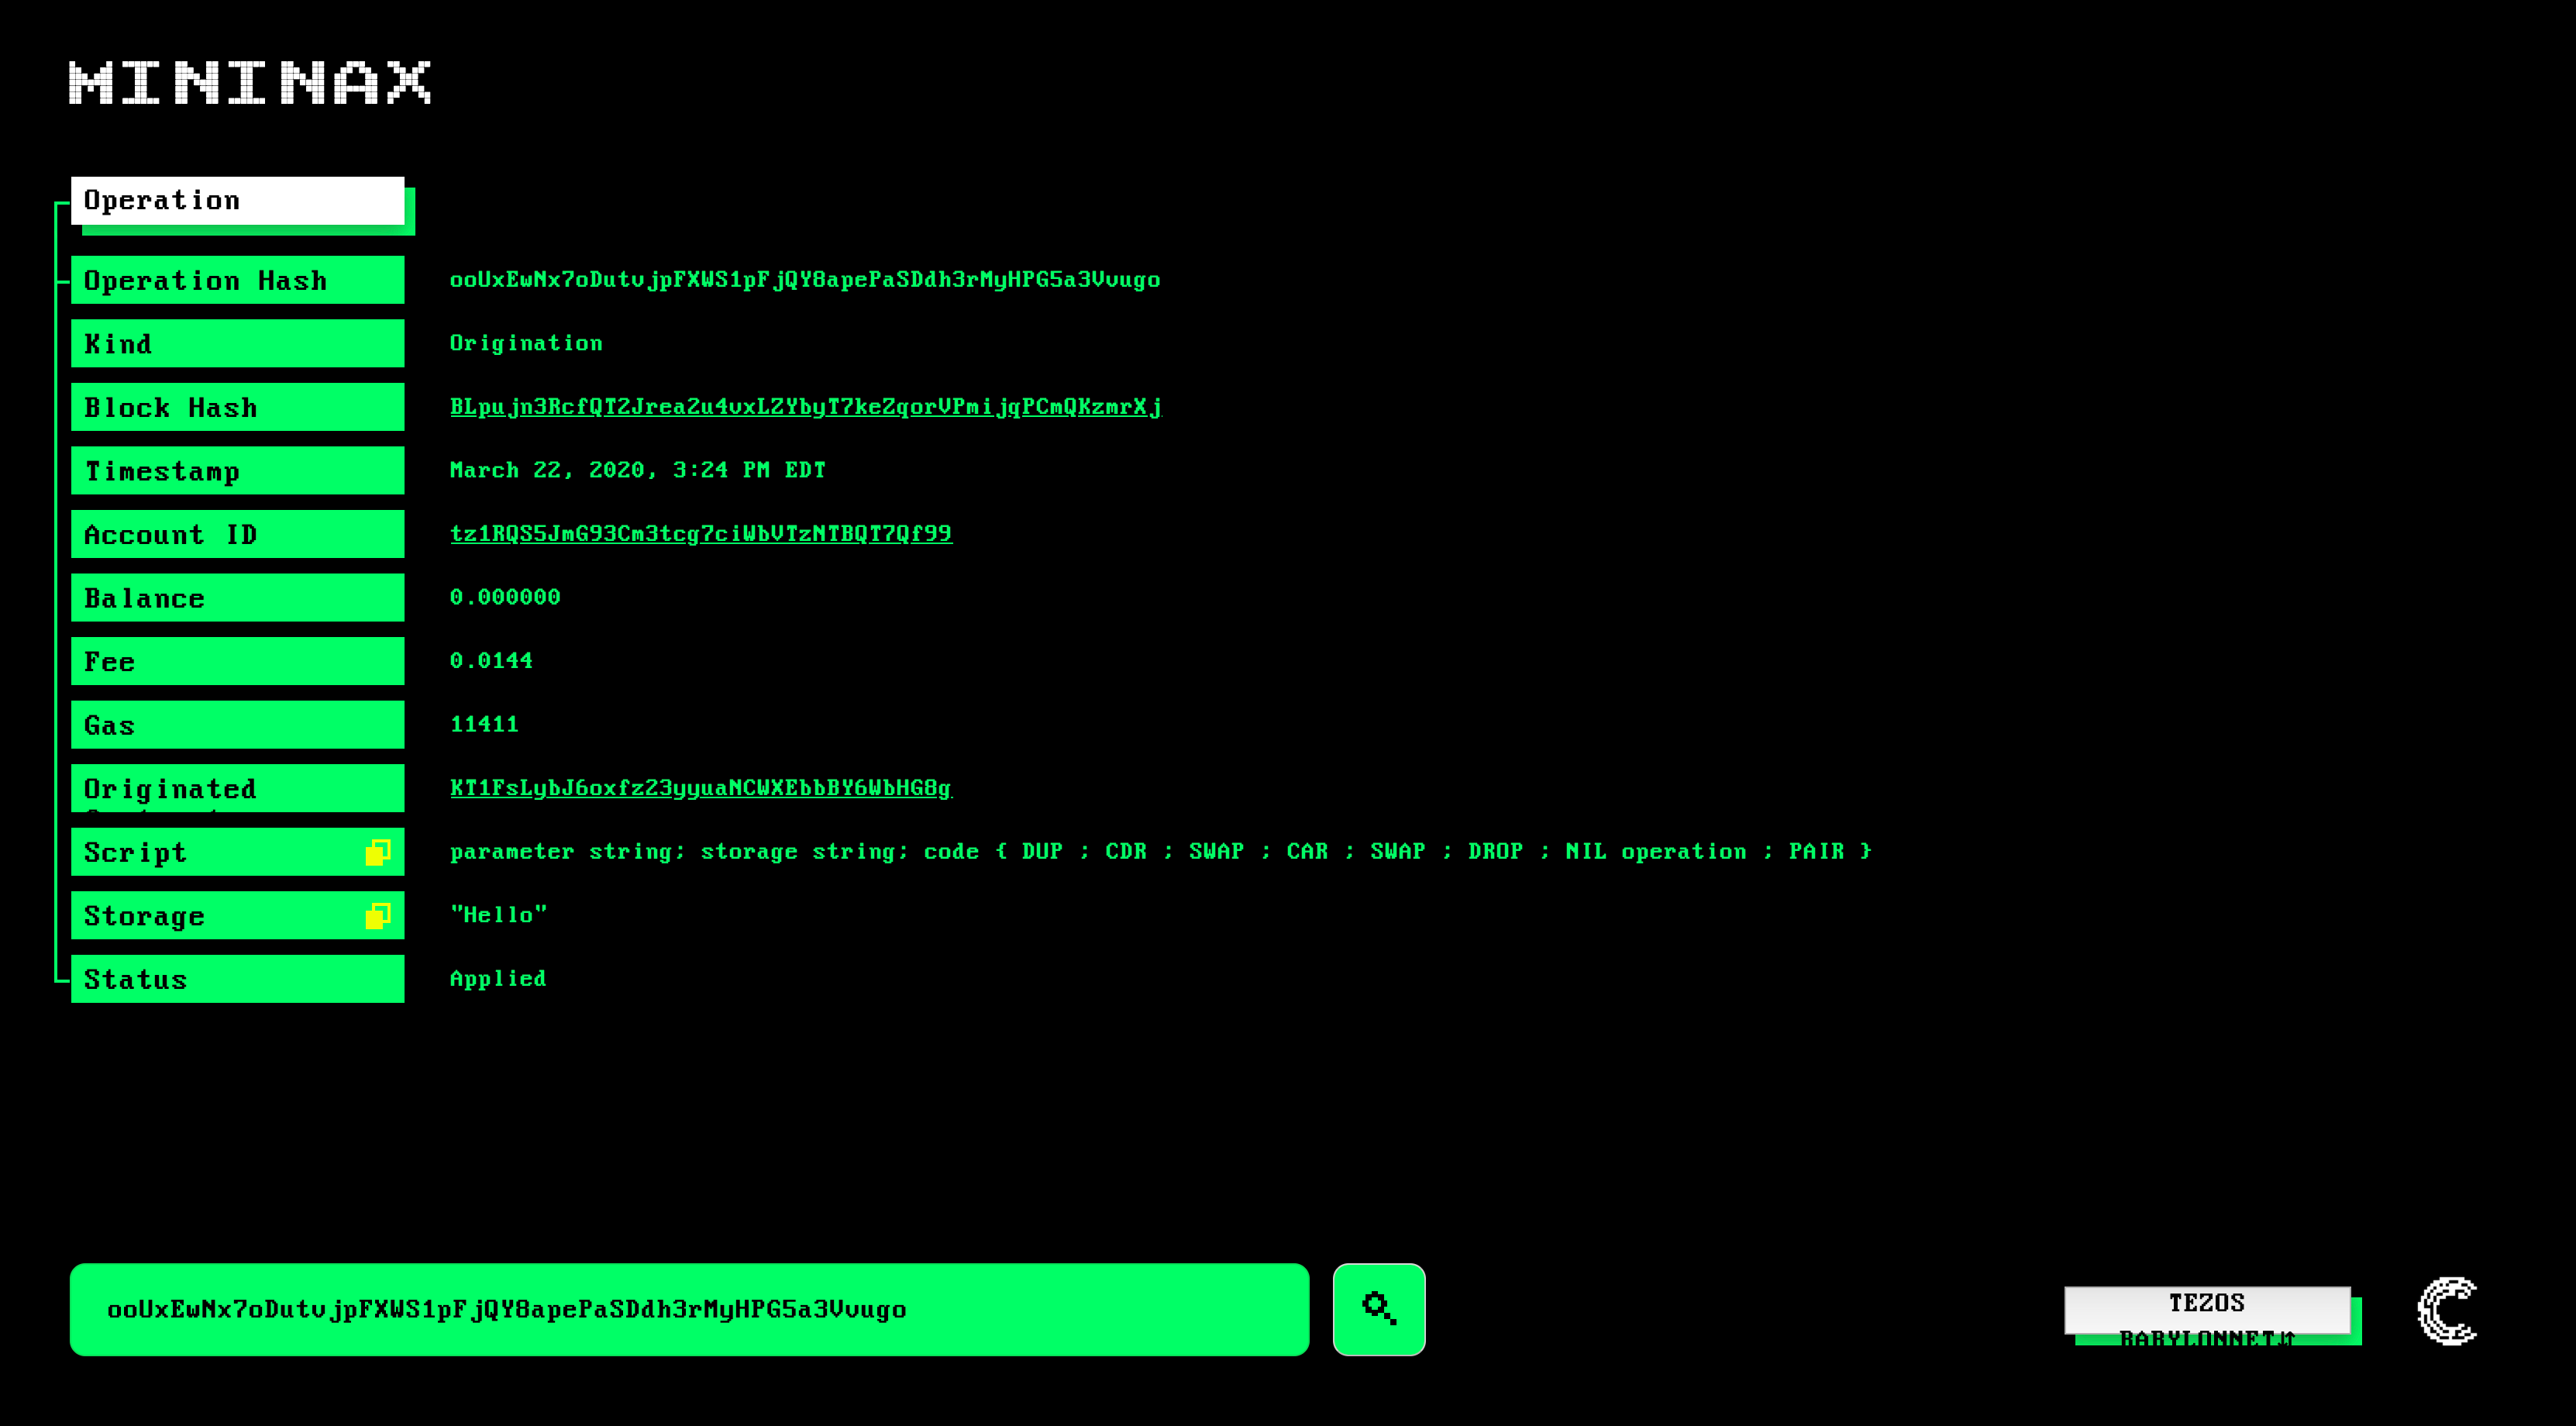
It's a good idea to use high fees on testnets but feel free to choose any appropriate fee during mainnet deployments. After waiting for a couple of minutes, click on the link that shows up and it will direct you to a Mininax page showing details of the origination. Indeed, the initial storage of the deployed contract on the blockchain contains the string "Hello":
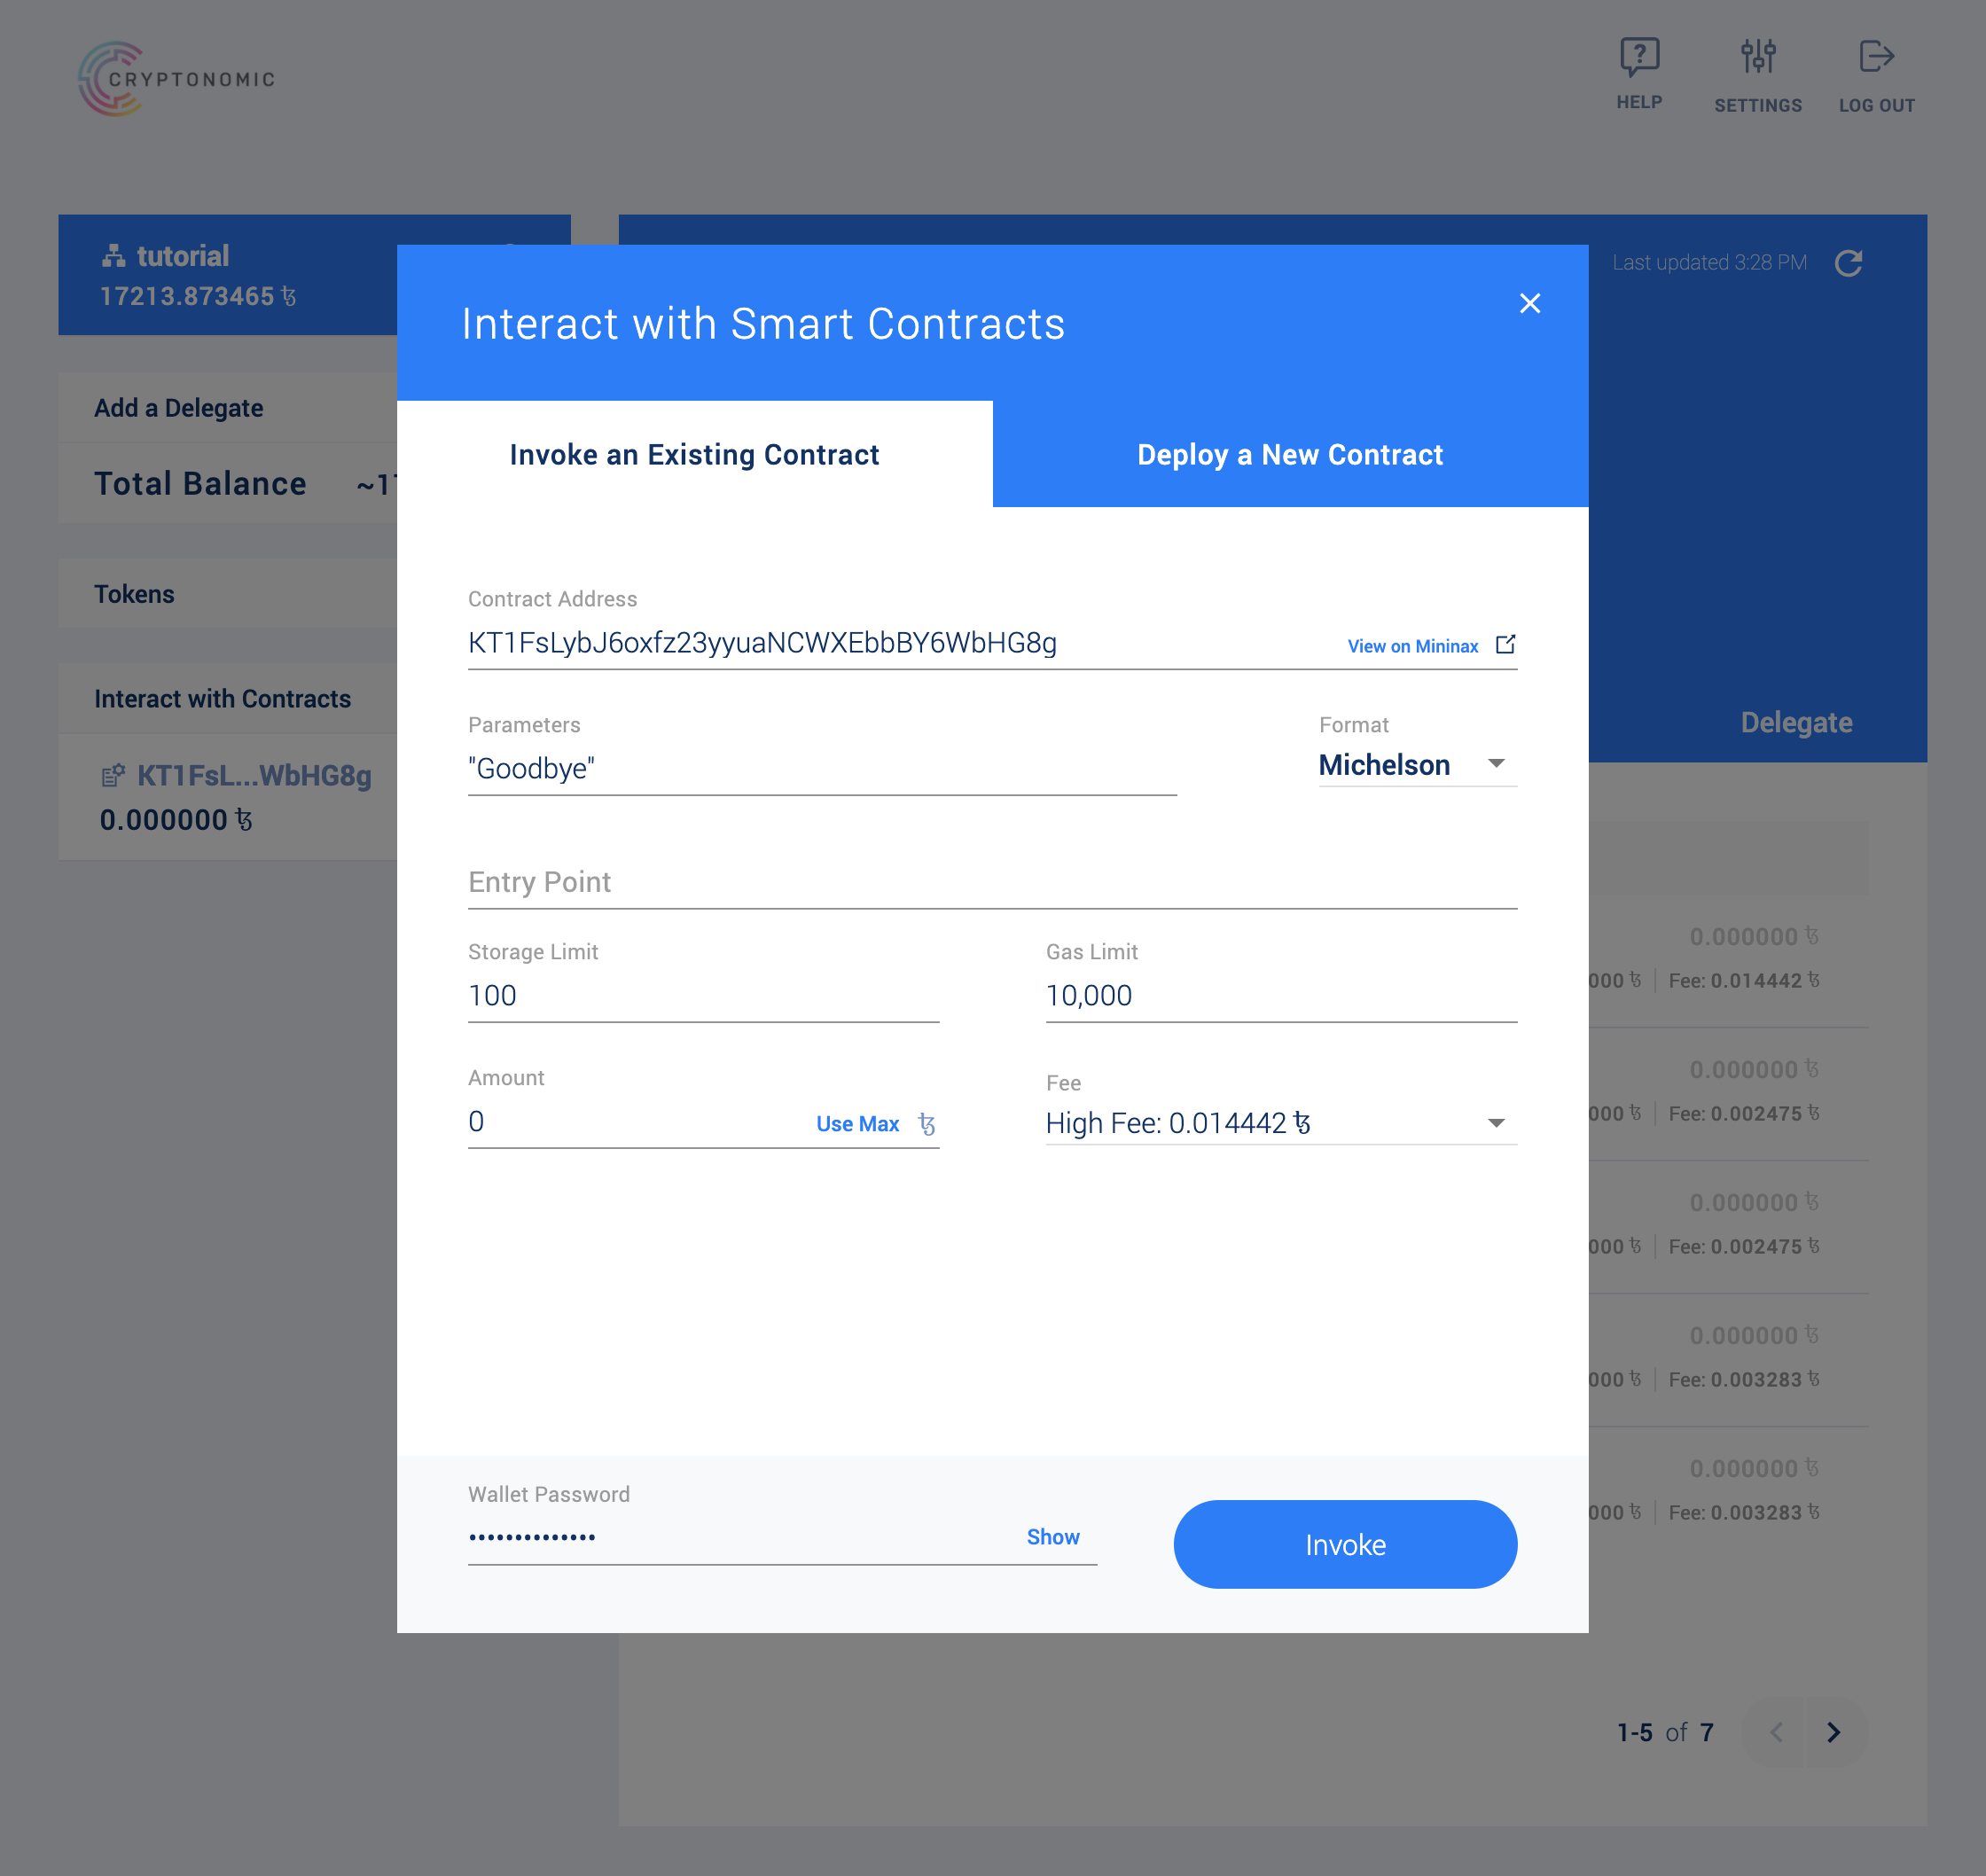
Let's invoke the update() function of the smart contract so that the storage contains "Goodbye" instead of "Hello". In Galleon, click on "Interact with contracts" and then "Invoke an Existing Contract". Use the settings shown below:
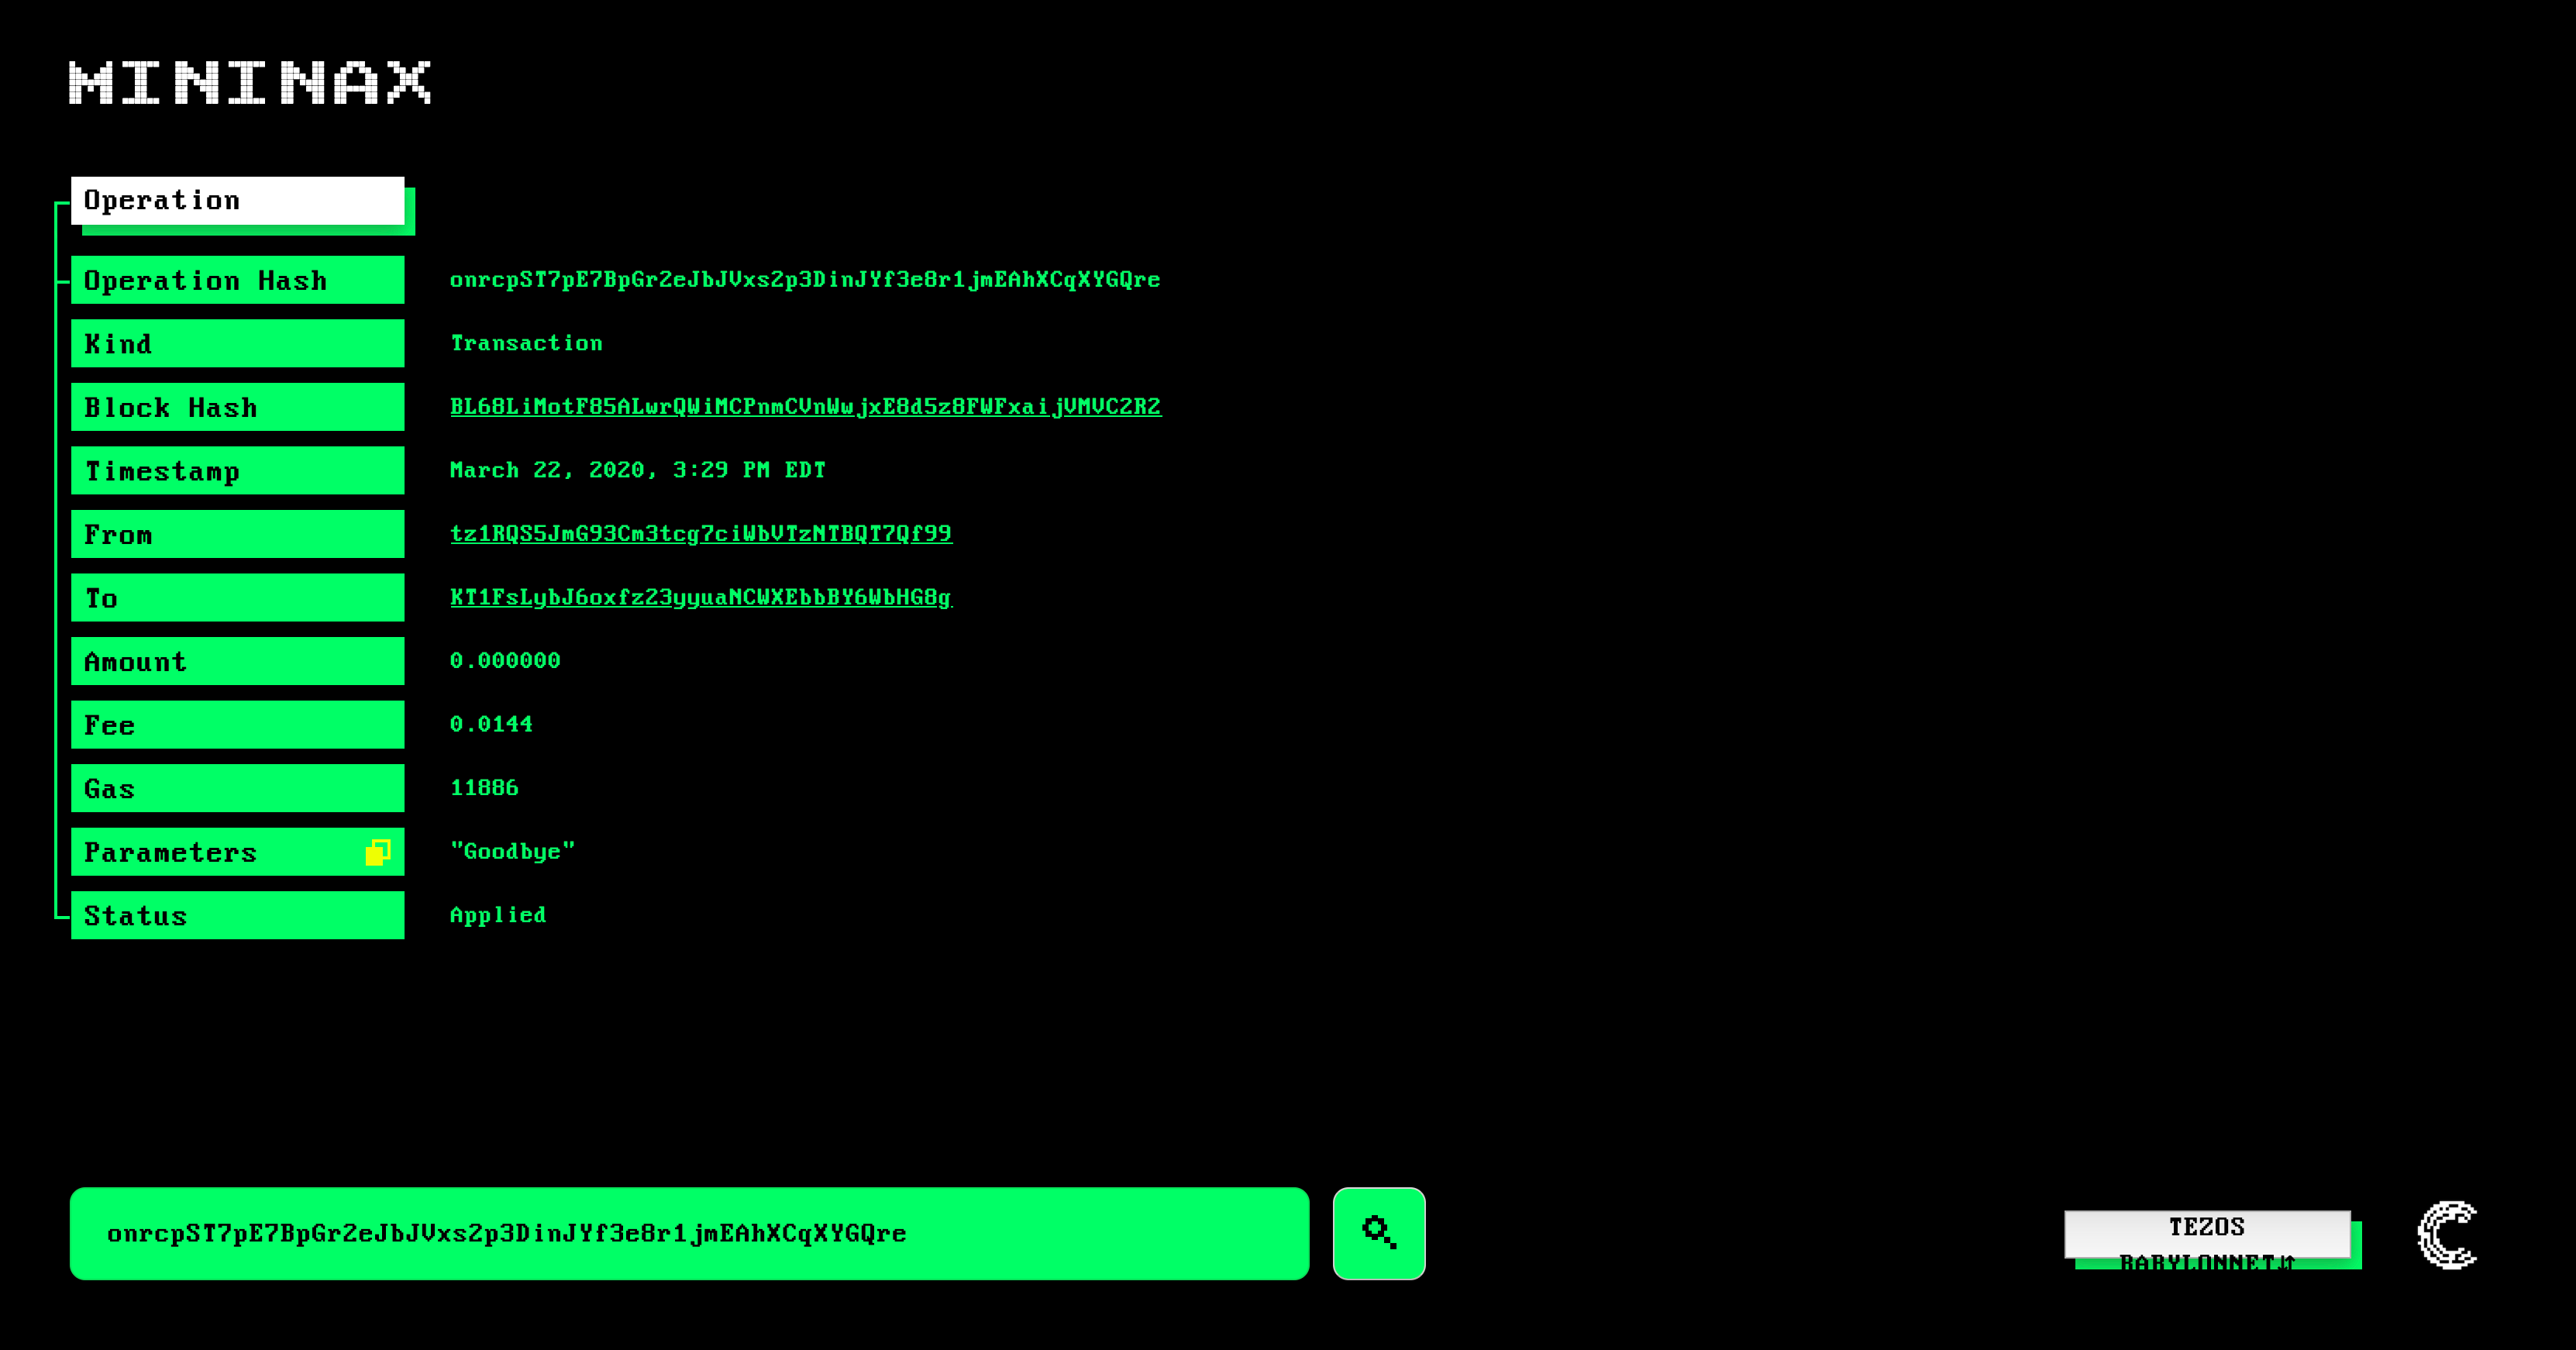
Once again, we'll wait a couple of minutes before clicking on the link that shows up. Mininax now shows the updated storage value!
Of course, many of us prefer to deploy and interact with contracts programatically instead of using a GUI wallet. Worry not, we have ConseilJS at our disposal! As you can see in this GitHub gist, both the actions above can be done with a few lines of code. As this is a twenty minute tour, we are not going to look at the specific of the code but here are the most relevant bits for your reference:
      const nodeResult = await TezosNodeWriter.sendContractOriginationOperation(tezosNode, keystore, 0, undefined, fee, '', 1000, 100000, contract, storage, TezosParameterFormat.Michelson);

      const nodeResult = await TezosNodeWriter.sendContractInvocationOperation(tezosNode, keystore, address, 10000, fee, '', freight, gas, entrypoint, parameter, TezosParameterFormat.Michelson);
Observe these lines use the settings we obtained from Nautilus Cloud:
      const tezosNode = 'https://tezos-dev.cryptonomic-infra.tech:443';
      const conseilServer = { url: 'https://conseil-dev.cryptonomic-infra.tech:443', apiKey: 'ab682065-864a-4f11-bc77-0ef4e9493fa1', network: 'carthagenet' };
Some of the materials in the Documentation section go over the details of contract interaction with ConseilJS.
Now for the final step we can run some simple analytics on our contract using Arronax. A shared report shows us all the invocations of the contract with address KT1EhyNUyAUG42udmJzfAz7WDL2daDNb2cwv deployed and invoked by the ConseilJS code above. The report should look something like this:

Observe, at the time this tutorial was last updated, there were four invocations of the contract and a new string was stored each time. Click the Filter button and see how we are specifically looking at transactions sent to KT1EhyNUyAUG42udmJzfAz7WDL2daDNb2cwv. Feel free to click on columns and try different combinations of columns to explore the dataset. Once you deploy your own smart contracts, you can set up a bunch of reports to analyze things like your contract's top callers, the functions used the most and the peak times when your contract is used. Remember, Arronax runs off Conseil so a Conseil query is being submitted each time you run an Arronax report.
So there you have it, a lightening round through the Cryptonomic stack. Don't hesitate to seek help if any of these bits were confusing for you. Check out the Documentation section to get more in depth information about each product. Happy hacking!
The FA1.2 smart contract standard marked a new step in the development possibilities of the Tezos ecosystem by setting specifications for the creation and management of new fugible tokens on the Tezos network.
We can now deploy smart contracts to create tokens that can be transferred and exchanged with no loss of value directly on the Tezos blockchain!
More detailed information on the standard can be found here!
Using ConseilJS, we can easily deploy and invoke such a contract! Before we start, make sure you have NodeJS and ConseilJS installed. You can run:
npm i conseiljsto add our package to your Node project. If you don't have NodeJS, check this out for more information on how to get started! We only support Node v12.16.1 which is the current LTS version, so make sure you install NVM (Node Version Manager) to updrade and downgrade Node as needed, which can be found here.
First, we need to login to Nautilus Cloud. Keep the page handy, we'll need the API keys and node links later. Let's work in TypeScript, and get a fresh .ts file in your NodeJS project. Throw these few lines at the top, they'll handle all of the imports we need for this:
      // This imports the FileSystem module which allows us to read files in
      import * as fs from 'fs';

      // These lines contain all of the ConseilJS imports needed for our code
      import { TezosConseilClient, TezosWalletUtil, setLogLevel, KeyStore, Tzip7ReferenceTokenHelper } from 'conseiljs';
      import { ConseilQueryBuilder, ConseilOperator, ConseilDataClient } from 'conseiljs';
Let's set up some constants needed for connecting and deploying to the blockchain. All of this information can be found on Nautilus Cloud! We'll need the URL of a tezos node and the URL of the Conseil Server (along with our API key to gain access). Using these, we can define these constants:
      const tezosNode = '...';                                                        // You can get this from Nautilus Cloud, make sure you take the testnet one!
      const conseilServer = { url: '...', apiKey: '...', network: 'carthagenet' };    // Enter both the testnet Conseil Node URL and API Key here!
      const networkBlockTime = 30 + 1;                                                // Because testnet's block time is 30 seconds, we wait 31 seconds before checking for a block update
Make sure your links above go to port 443! The URL should end with ':443', if it doesn't, add that to the URL for it to work!
Now let's get some funds to play with. Visit the testnet faucet and download two sets of keys:
              {
                "mnemonic": [
                  "right",
                  "bomb",
                  "sea",
                  "paper",
                  "picnic",
                  "wealth",
                  "slush",
                  "hair",
                  "maximum",
                  "tobacco",
                  "ritual",
                  "air",
                  "treat",
                  "inherit",
                  "undo"
                ],
                "secret": "2448de482f7c249ca0d0bb7fb30aa4faa65eb1ef",
                "amount": "2406500031",
                "pkh": "tz1fLQFXALX4pntvRrER21PSQtyaBFYFR7Ut",
                "password": "8mV9AHVZkF",
                "email": "[email protected]"
              }
And another one!
              {
                "mnemonic": [
                  "crucial",
                  "process",
                  "manage",
                  "more",
                  "damp",
                  "frog",
                  "inside",
                  "reveal",
                  "below",
                  "mandate",
                  "web",
                  "wrist",
                  "grocery",
                  "give",
                  "fitness"
                ],
                "secret": "320f40c4d5b416f58b5e0b099474188e8be7a331",
                "amount": "26523282433",
                "pkh": "tz1UvB93uihSL2ktgePmRrN5C71VMYjAGrWC",
                "password": "GscjPmXhau",
                "email": "[email protected]"
              }
With these accounts ready, we can get started directly in ConseilJS! With the files that we downloaded earlier, we don't need to manually enter data like we did in the previous tutorial. We can import the FileSystem module (imported before as fs) to quickly load and parse the JSON files into an object as seen below. Now, using the TezosWalletUtil, which was imported from ConseilJS, we can feed in the values from the JSON file to initialize the account from the file using the unlockFundraiserIdentity() function.
      async function initAccount(account: string): Promise {

        console.log(" ~~ initAccount");
        console.log(`loading ${account} faucet file`);

        const faucetAccount = JSON.parse(fs.readFileSync(`${account}.json`, 'utf8'));

        const keystore = await TezosWalletUtil.unlockFundraiserIdentity(faucetAccount['mnemonic'].join(' '), faucetAccount['email'], faucetAccount['password'], faucetAccount['pkh']);
        console.log(`public key: ${keystore.publicKey}`);
        console.log(`secret key: ${keystore.privateKey}`);
        console.log(`account hash: ${keystore.publicKeyHash}`);

        return keystore;
      }
Moving on, we start getting to the real meat of the code. Let's make an async run function that will handle all of the necessary code:
      async function run() {

      }
Inside the function, let's start by setting up some more constants. We need to have a contract originator and issuer, which will come from the two files we downloaded from the faucet. Set these two constants to be the names of the files you downloaded, which also happen to be the account IDs. Eventually, we will pass this string to the initAccount() function we wrote before to set up those accounts. The originator is the account which will deploy the smart contract, while the issuer is the account that will control the issuing of fungible tokens.
      const originator = "tz1VXhEA5CiVWeyQP4FomBKTFRC1cmsBWZcY";
      const issuer = "tz1XthtNSi8tdnizeEDULvpzx7mxvverYK4b";
We also need to define some temporary variables, which we will use throughout the code to store outputs and other data. We can store these as follows, and then initialize the originator account, which we'll need to use to originate the contract. We can store its data in the "keystore" variable so we can access it at any time.
      let groupid ='';
      let contractAddress = '';
      let mapid = 0;

      let keystore = await initAccount(originator);
Now with all of this set up, let's deploy the contract! ConseilJS has a module called Tzip7ReferenceTokenHelper (referred to henceforth as TokenHelper), which gets its name from the TZIP-7 proposal and the reference implementation of the token contract in that proposal. The module can be used to deploy and invoke that contract easily! The deployContract() function gives us flexibility to set essential features of the contract, like the supply. We can store the output in a groupid variable to reference the operation later.
                                                              //                                                           supply
      groupid = await Tzip7ReferenceTokenHelper.deployContract(tezosNode, keystore, 100_000, keystore.publicKeyHash, true, 0);
We should make sure the operation succeeded, using the awaitOperationConfirmation() method of the the TezosTokenClient class, and passing in the groupid from the previous call. This will return some data about the completed operation, which we can then parse to get the contractAddress.
                                                                             //                                              duration
      let conseilResult = await TezosConseilClient.awaitOperationConfirmation(conseilServer, conseilServer.network, groupid, 5, networkBlockTime);
      contractAddress = conseilResult['originated_contracts'];
Let's throw in some log statements for good measure to verify that the contract is in the place that we expect using the verifyDestination() function in the TokenHelper module.
      console.log(`deployed token at ${contractAddress} (${groupid})`);

      console.log(`verify: ${await Tzip7ReferenceTokenHelper.verifyDestination(tezosNode, contractAddress)}`);
Now, you might be wondering, "we deployed a contract, but where is it?" The great thing about the TokenHelper is that it has a default token contract that it will deploy and set up! For simple deployments of tokens, this is ideal, and if we want to go back and define a more complex token smart contract, we can easily deploy that as well using ConseilJS!
Now that we have a contract deployed, we can collect the storage from that contract to get more specifics about it, like the map ID, which we will need to use later to get data about the contract.
      const simplestorage = await Tzip7ReferenceTokenHelper.getSimpleStorage(tezosNode, contractAddress);
      console.log(`simplestorage: ${JSON.stringify(simplestorage, undefined, 2)}`);
      mapid = simplestorage.mapid;
This is all good, we have a contract deployed. But let's say we want to transfer the "ownership" of the contract to a different account. Say, if we coded the contract for someone else, that account should have control. Luckily for us, this is no problem in ConseilJS! Using the setAdministrator() function of the TokenHelper, we can quickly perform this operation.
      console.log(`token administrator: ${await Tzip7ReferenceTokenHelper.getAdministrator(tezosNode, contractAddress)}`);
                                                                //                                             fee      gas      freight
      groupid = await Tzip7ReferenceTokenHelper.setAdministrator(tezosNode, keystore, contractAddress, issuer, 100_000, 125_000, 1_000);

      console.log(`token administrator: ${await Tzip7ReferenceTokenHelper.getAdministrator(tezosNode, contractAddress)}`);
Now if we want to perform more contract operations, we need to initialize the issuer account, just as we did before with the originator.
keystore = await initAccount(issuer);
Now the fun begins! With the TokenHelper, we can quickly and easily perform different token actions with the contract we deployed, without having to go through the complex and tedious contract entrypoints. To start, now that we have the issuer set up, we need to activate the ledger, which is the smart contract functionality of making and recording transactions. When we initially deployed the contract, we set it to "paused" instead of "active" so that we could get the contract set up before we run it. Now that it’s ready, we can activate it to use it’s functionality! The following code uses the TokenHelper to activate the contract so we can start calling it, while the surrounding log statements print whether we are active or not.
      console.log(`token ${(await Tzip7ReferenceTokenHelper.getPaused(tezosNode, contractAddress) === true) ? 'paused' : 'active' }`);
                                                              //                                     fee     gas      freight
      groupid = await Tzip7ReferenceTokenHelper.activateLedger(tezosNode, keystore, contractAddress, 50_000, 125_000, 100);
      console.log(`token ${(await Tzip7ReferenceTokenHelper.getPaused(tezosNode, contractAddress)) ? 'paused' : 'active' }`);
But now we have an activated ledger without any tokens yet! Once again, TokenHelper comes to the rescue as we can mint new tokens easily using the mint() function. The log statements output the amounts of coin in circulation, while the mint statement we are calling puts a whopping 2 trillion tokens into circulation, US Federal Reserve style.
      console.log(`current supply: ${await Tzip7ReferenceTokenHelper.getTokenSupply(tezosNode, contractAddress)}`);
                                                    //                                     fee             amount         gas      freight
      groupid = await Tzip7ReferenceTokenHelper.mint(tezosNode, keystore, contractAddress, 50_000, issuer, 2_000_000_000_000, 125_000, 100);
      console.log(`new supply: ${await Tzip7ReferenceTokenHelper.getTokenSupply(tezosNode, contractAddress)}`);
      console.log(`${issuer} balance: ${await Tzip7ReferenceTokenHelper.getAccountBalance(tezosNode, mapid, issuer)}`);
Now that we have a billion tokens, let's spread the love and airdrop some to other accounts. Let's start by generating a Conseil Query to get 30 large testnet accounts. We first initialize a blank Query, and then add different fields and predicates to build an increasingly complex query. Just a warning, this script will take a while to run!
      let largeAccountQuery = ConseilQueryBuilder.blankQuery();
      largeAccountQuery = ConseilQueryBuilder.addFields(largeAccountQuery, 'account_id');
      largeAccountQuery = ConseilQueryBuilder.addPredicate(largeAccountQuery, 'balance', ConseilOperator.GT, [9000000000]);
      largeAccountQuery = ConseilQueryBuilder.addPredicate(largeAccountQuery, 'account_id', ConseilOperator.STARTSWITH, ['tz']);
      largeAccountQuery = ConseilQueryBuilder.addPredicate(largeAccountQuery, 'account_id', ConseilOperator.IN, [originator, issuer], true);
      largeAccountQuery = ConseilQueryBuilder.setLimit(largeAccountQuery, 30);
      const largeAccountResult = await ConseilDataClient.executeEntityQuery(conseilServer, 'tezos', conseilServer.network, 'accounts', largeAccountQuery);
      const largeAccounts = largeAccountResult.map(a => a.account_id);
Now that we have this data, we can iterate through it, and use a TokenHelper method to transfer the token over to their accounts easily!
      for (let i = 0; i < largeAccounts.length; i++) {
                                                                 //                                     fee     source                  destination       amount gas      freight
        groupid = await Tzip7ReferenceTokenHelper.transferBalance(tezosNode, keystore, contractAddress, 50_000, keystore.publicKeyHash, largeAccounts[i], 1_000, 125_000, 100);
        console.log(`balance transfer to "${largeAccounts[i]}"`);
      }
And we've done it! Let's repeat the steps for the 30 smallest accounts.
      let smallAccountQuery = ConseilQueryBuilder.blankQuery();
      smallAccountQuery = ConseilQueryBuilder.addFields(smallAccountQuery, 'account_id');
      smallAccountQuery = ConseilQueryBuilder.addPredicate(smallAccountQuery, 'balance', ConseilOperator.LT, [9000000000]);
      smallAccountQuery = ConseilQueryBuilder.addPredicate(smallAccountQuery, 'balance', ConseilOperator.LT, [999000000]);
      smallAccountQuery = ConseilQueryBuilder.addPredicate(smallAccountQuery, 'account_id', ConseilOperator.STARTSWITH, ['tz']);
      smallAccountQuery = ConseilQueryBuilder.addPredicate(smallAccountQuery, 'account_id', ConseilOperator.IN, [originator, issuer], true);
      smallAccountQuery = ConseilQueryBuilder.setLimit(smallAccountQuery, 90);
      let smallAccountResult = await ConseilDataClient.executeEntityQuery(conseilServer, 'tezos', conseilServer.network, 'accounts', smallAccountQuery);
      const smallAccounts = smallAccountResult.map(a => a.account_id);
      console.log(smallAccounts.length);

      for (let i = 0; i < largeAccounts.length; i++) {
          for (let j = 3 * i, k = 3 * (i + 1); j < k; j++) {
              groupid = await Tzip7ReferenceTokenHelper.approveBalance(tezosNode, keystore, contractAddress, 50_000, smallAccounts[j], 100, 125_000, 100);
              console.log(`approve allowance for "${smallAccounts[j]}"`);
          }
      }

      console.log(`current supply: ${await Tzip7ReferenceTokenHelper.getTokenSupply(tezosNode, contractAddress)}`);
      console.log(`${issuer} balance: ${await Tzip7ReferenceTokenHelper.getAccountBalance(tezosNode, mapid, issuer)}`);
Those last two log statements let us find out how many tokens we put into circulation and our (the issuer's) remaining token balance. Isn't creating a currency fun!
To look at the code in its entirety, checkout out this gist and the corresponding Medium article. Once again, feel free to reach out for any assistance whatsoever, and see our Documentation for a more in-depth look at the products used. Happy Hacking!
Visit the tutorial on the Conseil wiki.
ConseilJS is the Cryptonomic one-stop solution for all of your Tezos needs. Using this web library, you can build powerful web apps and DApps that can leverage the full depth of the Tezos platform.
Let’s start by querying some accounts.
The following tutorial’s code is in web based JS. It can be entered in a script tag, or a standalone ‘.js’ file called from an HTML page. Instead of using Node, it has been imported using the following CDN link here. Just copy and paste it above where your JS is initialized like this:
<script src="https://cdn.jsdelivr.net/gh/cryptonomic/conseiljs/dist-web/conseiljs.min.js" integrity="sha384-eSd4aru4A1k5ejohBE9T8uPo4P1TT6TTdnuO71HrrNr0pmZaF+C5/YQyYv0JNqhV" crossorigin="anonymous"></script>
Keep in mind that the “integrity” section changes with every update, so if your code doesn’t work, get the latest CDN from the link above.
For a more robust installation of ConseilJS, you can see the instructions here for your language of choice (TypeScript or JavaScript).
We first need to visit Nautilus Cloud in order to procure our ConseilJS API Keys and Tezos Node connection information for the appropriate Tezos Network (mainnet or testnet). If you’d rather host your own Tezos and Conseil node, you can do that too, but for simplicity, we recommend using our own hosted solutions.
We can initialize a connection to Conseil with our API Keys as follows:
      const conseilServer = {
         url: 'https://conseil-prod.cryptonomic-infra.tech:443',
         apiKey: 'f86ab59d-d2ea-443b-98e2-6c0785e3de8c',
         network: 'mainnet'
      };
For the URL, put in the link to the Conseil Node. We can also make another constant to store the Tezos Node address, so let’s do that now as well.
const tezosNode = “https://tezos-prod.cryptonomic-infra.tech:443”
The ‘conseilServer’ object can now be used to authenticate different Conseil queries, while the ‘tezosNode’ will come in handy for many different on-chain operations.
Now, let’s use the ConseilQuery class to start querying for account balances. We start with a blank query:
let query = conseiljs.ConseilQueryBuilder.blankQuery();
Then, we add on the fields we want to be part of the result set, in this case, the “balance” of the accounts, and their “account_id.” We can add as many fields as we want here, given that they are valid fields, but for now, let’s keep it simple.
query = conseiljs.ConseilQueryBuilder.addFields(query, 'balance', 'account_id');
If we want a specific account, we can add a predicate too, which allows us to query by different conditional operators. This takes in a ConseilOperator enum that we use to send different parameters to the query.
query = conseiljs.ConseilQueryBuilder.addPredicate(query, 'account_id', conseiljs.ConseilOperator.EQ, ["tz1gfArv665EUkSg2ojMBzcbfwuPxAvqPvjo"]);
Here, we are mandating that the account ID of the query is equal to the address given, using ‘conseiljs.ConseilOperator.EQ’. Feel free to replace the address there with your own address! You can find more information about the different ConseilOperators here.
If we leave this line out, we'd just get a bunch of accounts without any ordering. If we want ordered data, we need to specify which element(s) to order by, and whether it should be ascending or descending with the ConseilSortDirection enum.
query = conseiljs.ConseilQueryBuilder.addOrdering(query, "balance", conseiljs.ConseilSortDirection.DESC);
There is a default limit of 100 rows of output per query. However, this is easy to increase or decrease!
query = conseiljs.ConseilQueryBuilder.setLimit(query, 684);
Now we have a basic query set up for accounts and balances!
      let query = conseiljs.ConseilQueryBuilder.blankQuery();
      query = conseiljs.ConseilQueryBuilder.addFields(query, 'balance');
      query = conseiljs.ConseilQueryBuilder.addFields(query, 'account_id');
      query = conseiljs.ConseilQueryBuilder.addOrdering(query, "balance", conseiljs.ConseilSortDirection.DESC);
      query = conseiljs.ConseilQueryBuilder.setLimit(query, 250);
We can now run this query using the ConseilDataClient, passing in the configuration from Nautilus Cloud, the “entity” that we want to query (in this case, “accounts”), and the query itself. Note that this is an asynchronous function, so it should be in its own async function, and will delay further execution until the query is loaded from the server.
result = await conseiljs.ConseilDataClient.executeEntityQuery(conseilServer, 'tezos', conseilServer.network, 'accounts', query);
In order to make this asynchronous function work, let’s make an async wrapper function for the executeEntityQuery function that will print the results, and return them as well.
      let execute = async function(query, entity) {
          let result = await conseiljs.ConseilDataClient.executeEntityQuery(conseilServer, 'tezos', conseilServer.network, entity, query);
          console.log(result)
          return result
      }
The function returns an array of objects which we can then use for whatever purpose we dream of, such as graphing or running further operations. We can use this function to execute the query as follows:
result = execute(query, "accounts")
Let’s take a step back here to think about what we’re doing. Each operation performed is included in a block on the chain. ConseilJS uses the API provided by Nautilus Cloud to access data indexed by Conseil. The queries that we run are powered by Cryptonomic’s servers that index block data and convert the blockchain into more accessible relational database tables. If this were to be done without ConseilJS, we’d have to connect to a TezosNode directly using the tezos client, and manually define and run all of these operations. This greatly simplifies the Tezos development process!
Accounts are one of many entities. If we want to see different operation details, or even block details, we can simply specify the entity that you want to query in executeEntityQuery and adjust your predicates accordingly (we’re querying the blocks entity next!)
To see all of the different entities and predicates in action, check out Cryptonomic’s own data analytics engine, Arronax! This site acts as a powerful GUI for our Conseil Querying, and runs off of a Conseil and ConseilJS.
The interface allows you to add fields, predicates, and even aggregations with ease. It works not only as a standalone querying tool, but also as a test board for making sure your queries work as intended before running them in ConseilJS.
Here is the complete Accounts Query code that you can play around with yourself!
A common account operation is a delegation, which is essentially choosing a baker and offering them the stake from your tez in return for their baking rewards.
This is the Tezos Liquid Proof of Stake (LPoS) model in action! Instead of a regular proof of stake model, where a user’s baking and voting rights come strictly from the amount of coin that they hold, the LPOS means that a user’s stake is liquid, allowing users to lend their stake to other bakers for a share of the baking profits.
To query bakers that we might want to delegate to, we can query run another Conseil query. There are a number of ways to gauge a baker’s performance, such as their delegated balance (the higher results in a higher likelihood of baking a block), or the number of blocks that a baker has baked. Let’s work with the latter.
The number of blocks a baker has baked is not a property of the “bakers” entity. Instead, we know the baker that baked each block, so we can run a simple query on the “blocks” entity to get our list of bakers.
The first steps should be no puzzle by now, create a blank query, and add the fields we want. In this case, we want the block hash, which will act like a unique identifier for each block, and the baker that produced each block.
      let query = conseiljs.ConseilQueryBuilder.blankQuery();
      query = conseiljs.ConseilQueryBuilder.addFields(query, 'baker');
      query = conseiljs.ConseilQueryBuilder.addFields(query, 'hash');
Then, we can add a predicate for all blocks produced after a certain date. This will make sure our baker data is recent and relevant! You don’t have to add a field to a query if you want it to be in a predicate, so we don’t need to include the timestamp data as a field.
query = conseiljs.ConseilQueryBuilder.addPredicate(query, 'timestamp', conseiljs.ConseilOperator.AFTER, [date]);
Now we can add a new element to the query: the aggregation function. This allows us to aggregate data per unique element in the table: in this case, the block hash. We can set up a counting aggregation function, and apply it to the block hashes. As a result, the query will count all of the block hashes per baker, and create a new row, titled “count_hash.”
query = conseiljs.ConseilQueryBuilder.addAggregationFunction(query, "hash", conseiljs.ConseilFunction.count);
The new row that we have should be sorted, so that we can easily find the baker with the most blocks. So we can add a quick ordering to the “count_hash” table. And finally set a limit of 20, so our data is quickly queried and downloaded.
      query = conseiljs.ConseilQueryBuilder.addOrdering(query, "count_hash", conseiljs.ConseilSortDirection.DESC);
      query = conseiljs.ConseilQueryBuilder.setLimit(query, 20);
Now that we have the query set up, one more familiar line should run it for us. Remember, we’re querying the “blocks” entity, not bakers!
      const result = await conseiljs.ConseilDataClient.executeEntityQuery(
          conseilServer,
          'tezos',
          conseilServer.network,
          'blocks',
          query
      );
We can also call this in our wrapper function that we defined earlier:
result = execute(query, "blocks")
The output is once again an array of objects:
      [{count_hash: "5015", baker: "tz1irJKkXS2DBWkU1NnmFQx1c1L7pbGg4yhk"},
      {count_hash: "2268", baker: "tz1gfArv665EUkSg2ojMBzcbfwuPxAvqPvjo"},
      {count_hash: "2170", baker: "tz2TSvNTh2epDMhZHrw73nV9piBX7kLZ9K9m"},
      {count_hash: "1939", baker: "tz1S8MNvuFEUsWgjHvi3AxibRBf388NhT1q2"},
      {count_hash: "1726", baker: "tz3NExpXn9aPNZPorRE4SdjJ2RGrfbJgMAaV"}]
You can find the complete baker query here!
Before we can delegate our stake though, we need to initialize some accounts.
These queries can be used for their own standalone data analysis, or they can be used as the foundations for powerful dapps that interact with the chain and submit different operations. This makes coding a custom wallet app, multipurpose querying and transaction tool, or even your own GUI to a deployed smart contract is much easier with the ConseilJS interface.
The foundations of all of these queries are account operations, such as transferring tez or delegating. If we want to run account operations of our own, we need to set up and activate our own account. Let’s use the Testnet Faucet to get loaded with some XTZ. ConseilJS makes it simple to set up the account (remember to update the keys and URL in the conseilServer object from Mainnet to Testnet!)
      const conseilServer = {
         url: 'https://conseil-dev.cryptonomic-infra.tech:443',
         apiKey: ,
         network: 'carthagenet'
      };
We can copy the JSON file we get from the Faucet into our application, and send it to the TezosWalletUtil, using the unlockFundraiserIdentity() function.
      const keystore = await TezosWalletUtil.unlockFundraiserIdentity(
           faucetAccount.mnemonic.join(' '),
           faucetAccount.email,
           faucetAccount.password,
           faucetAccount.pkh
      );
This returns a keystore object, which contains our public and private key pair that we can use to authenticate many of the different operations we might want to accomplish. But not yet!
After this is done, we need to pass the keystore to another function to activate the account. The TezosNodeWriter can send an activation operation with the keys generated by the Wallet Util. This claims the associated account and allows us to use it and the tez that it stores, and is necessary because these testnet accounts mimic the original Tezos fundraiser accounts, where activation served as a security measure for protecting people’s funds.
      const result = await TezosNodeWriter.sendIdentityActivationOperation(
          tezosNode,
          keystore,
          faucetaccount.secret
      );
We have one more step until we’re good to go! The account revelation “reveals” the account by publishing its public key on the blockchain, allowing other accounts to confirm transactions signed by our account’s public key. It’s another method of the TezosNodeWriter.
const revelationResult = await TezosNodeWriter.sendKeyRevealOperation(tezosNode, keystore);
The full code for activating testnet accounts downloaded from the faucet can be found here!
If you need to work on transactions with real XTZ, ConseilJS can easily create and manage mainnet accounts for you! The process for creating a keystore for a mainnet account is just as simple.
First, we use the TezosWalletUtil function to generate a mnemonic, which is the random assortment of letters you might remember from the faucet. We can use these letters to activate an account, with the TezosWalletUtil’s unlockIdentityWithMnemonic() function.
      const mnemonic = TezosWalletUtil.generateMnemonic();
      const keystore = await TezosWalletUtil.unlockIdentityWithMnemonic(mnemonic, '');
It’s a good idea to log each of these so your users (or you!) can note these down just in case.
The next step is to reveal the account, the same way that we revealed the faucet generated account. While we don’t have to activate it this time, because this is a brand new account it will be empty, so before we can do anything, we would need to make sure the account has funds. So if you’re just playing around, we recommend using a faucet account for simplicity. Keeping the keys handy, we can now do things like transfer tez, or delegate! So let’s do that.
Let’s delegate to the baker with the most blocks baked, back from the query we had run on bakers. Thanks to the ordering we had applied, the baker with the most bloks is the first object in the list returned to us. Putting all of the tools we’ve learned together, this becomes quite simple using another method of the TezosNodeWriter class.
      const result = await conseiljs.TezosNodeWriter.sendDelegationOperation(
          tezosNode,
          keystore,
          keystore.publicKeyHash,
          result[0].baker,
          10000
      );
Now all that’s left is to wait for the pay period and collect our fresh tez!
The full code, with testnet account activation, the original baker query, and testnet delegation can be found here!
In order to transfer, you’ll need the keystore of your own account, and the account ID of another account. If you’re on testnet and need an account, just pick one off from Arronax’s testnet accounts page.
From there, transferring funds is really quite simple. The TezosNodeWriter has a sendTransactionOperation() which greatly simplifies the operation. Keep in mind that the amount and fee are measured in micro-tez (µꜩ) .
      const result = await TezosNodeWriter.sendTransactionOperation(
          tezosNode,
          keystore,
          ‘Account ID’,
          amount,
          fee,
          ''”
      );

      console.log(`Injected operation group id ${result.operationGroupID}`);
This operation, and all of the other operations we’ve done, is stored in the “result” variable, which contains a few operation details. Unfortunately, Tezos testnet currently has a problem with returning the operation ID. In order to counter this, we have a function that accepts the ID as an input, and returns the proper ID.
      function clearRPCOperationGroupHash(hash) {
          return hash.replace(/\"/g, '').replace(/\n/, '');
      }
You can get the correct group ID as follows:
result.operationGroupID = clearRPCOperationGroupHash(result.operationGroupID)
Now that we have the operation ID stored, say we want the gas that the transaction consumed, and its cycle. Let’s start with a blank query.
let query = conseiljs.ConseilQueryBuilder.blankQuery();
And then add the “operation_group_hash”, the “gas_consumed”, and the “cycle” as fields.
        query = conseiljs.ConseilQueryBuilder.addFields(
            query,
            ‘operation_group_hash',
            ‘gas_consumed’,
            ‘cycle’
        );
Then, just as we did with the account information query, we can add a predicate to the operation ID, that it must equal the ID returned by our transaction, so we get the details specific to that operation.
      query = conseiljs.ConseilQueryBuilder.addPredicate(
          query,
          ‘operation_group_hash’,
          conseiljs.ConseilOperator.EQ,
          [result.operationGroupID]
      );
Running this query against the “operations” entity will give us an object with the cycle and consumed gas for our operation.
      const result = await conseiljs.ConseilDataClient.executeEntityQuery(
          conseilServer,
          'tezos',
          conseilServer.network,
          'operations',
          query
      );
For the whole transaction code, check this out!
That’s all for a quick welcome tour of ConseilJS! If you need help, please feel free to reach out to us via email, or our Riot channels. For more documentation of ConseilJS, check out our docs page here. Good luck!
Coming soon...
Coming very soon!